i think that today went well we had a great musical track supplied and apart from the one scene which was not delivered the rest of the editing was complete. some great effects were added and some excellent editing was done to make some shoddy renders more dynamic and flowing.
favourite scenes for me in terms of editing were when nelsons sight blurs and his hand in front of his face became unfocused and when he tries to bring his hand in closer it becomes slightly more focused but then finally his vision fades away.
also another scene that i think that got edited well was the when the two ship slowing get closer and all the sound effects fade off to leave just the music playing.
Monday, 10 December 2007
Sunday, 9 December 2007
nelsons face

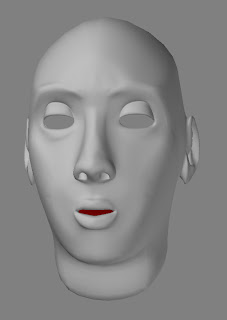
To help out a bit more i thought that id give the texture guys a hand and help them with some textureing. I created the texture map for nelsons face i was going to use the same texture map that i used when i created my face but then decided against it as the shots that i took were done using a mobile and so were not high resolution. So i used kerions face for nelson. the map was mixed and edited about and so when applied over the different geometry of nelsons face it no longer looks like Keirons so i think that we got a good result for the nelson character.
voice overs
the other day my self and richard went to go record some sounds for the voice over we recorded a voice of one of the lecturers but after we played it back it dident sound like what we needed the tone and speed was not quiet correct. so richard had a go, he had a better idea of what was required and so we did a recording of his voice and it turned out better so we went for that.
i had been searching for different sound effects and background music through out the weeks and so that day played one particular picece which i thourght would suit the scene where nelson gets shot really well however i no that alot of you agreed but unfortunatly some dident have the same talent at recognising a good tune so well see how it turns out in the final stages.
i had been searching for different sound effects and background music through out the weeks and so that day played one particular picece which i thourght would suit the scene where nelson gets shot really well however i no that alot of you agreed but unfortunatly some dident have the same talent at recognising a good tune so well see how it turns out in the final stages.
Thursday, 15 November 2007
Wednesday, 14 November 2007
rotating view
Sorry for the crappy camera work. it was late night and i just wanted to get it rendered.
Tuesday, 13 November 2007
All done


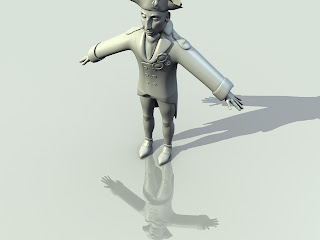
Haven't done much else these couple of days but i have finally completed nelson.
now before you ask, i know that nelson has his right arm missing but i have left it in purely for presentational purposes and also it will make selection and texturing easier.
One more thing that i have purposely left out is the hair I'm not sure what would be the best way of adding it. i can either make it like the way some of you added it to your heads or i can mould it on as part of the head like in the cartoon Monster House.
I think i need some sleep.
Monday, 12 November 2007
seriously stressful weekend

this has been a crazy weekend iv done nothing but sit in my room like some crazy geek and developed nelson.
at least I'm nearly there not much now only have the legs and shoes to create.
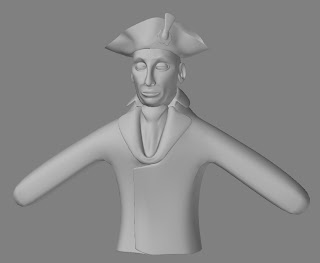
in this image you can see that i have completed the jacket and refined the cuffs also i have added his shoulder things and buttons as well as giving him his medals.
very very difficult, my eyes are burning!
Sunday, 11 November 2007
I think I want to cry

Wow I think everyone has underestimated the level of work that needs to go into nelson. I’ve been working on him for about ten hours and I’m not even half way.
Every image on the net of Nelson looks different and is low resolution and also they only contain the top half of his body and the ones that do have him in full view are ones where he is not wearing his battle attire this is beginning to become very frustrating.
Everything involved is either organic or fabric which means every crease or fold has taken ages to create. That stupid hat for instance, though might look simple to the eye, took ridiculously long to mould. Unfortunately this is not one of those items like canons which can be created in minutes using blocks or cylinders and then disguised with a texture map. It will be time consuming and will be difficult to create and I ask you guys out their, when you look at the images please don’t just glance at it and say its good or bad, STOP and think about how you would create each individual piece and how long it would take YOU to do and if you figure out quick fix tricks let me no.
O ye before you ask, it should be finished by the deadline I just wanted to let you no that this is no easy task and well basically just wanted to have a little moan
Wow I feel better already.
Stay tuned for future miseries and more images involving the development of Nelson.
Monday, 5 November 2007
last of the face
uv mapping
uv mapping
unwrapped maps
storyboard 5

25) Still in first person view nelson vision impairs and his hand becomes blurry. Small black borders close down indicating nelsons eyes closing. The audio deepens and sounds more drowned out.
26) The camera view continues to be in first person and it falls down to its side representing his head falling onto the deck.
27) His vision blurs and his eyes start to close even more.
28) The screen blacks out but the audio still can be heard in a drowned out tone. Writing fades in and out on screen and says how the battle was bravely fought and how nelsons unorthodox battle strategy helped win the war. Then finally still with continuous soft music the end credits scroll up.
Note: that this is just some of the main bits and the in between has to be filled in also this does not necessarily mean that this is the final story if any one has a more dynamic way of showing some scenes or better ideas leave your comments if enough people agree more revised story boards will be drawn up.
I hope that this helps clear up the story plot and also helps everyone to visualise the different scenes and camera angles.
I hope that this helps clear up the story plot and also helps everyone to visualise the different scenes and camera angles.
storyboard 4

19) An even closer view of nelson. Into his eyes.
20) Chain linked canon ball rips apart masts.
21) Shot of French ship exploding.
22) The sharp shooter spots nelson and takes the shot. Nelson jerks back as his body takes the full impact of the shot.
23) He falls to his knees and holds is hand over is bullet wound.
24) The camera goes into first person view and nelson takes his hand off his wound and looks at the blood dripping from his hand.
storyboard 3

13) The canon ball fires through rupturing the side of the French ship and destroying their canons. The view is from the front of the canon ball which means that it will not be necessary to show what its breaking apart but instead the flying shrapnel.
14) Shot of more carnage. Man gets hit by cannonball and smashes through ship.
15) The first shot of nelson on deck. Points orders at his men.
16) Man gets thrown overboard.
17) Closer shot of nelson revealing his expression and emotions.
18) A shot of man firing canon a demonstration of the power of canons and the recoil.
storyboard 2

7) French crew boy brings over heavy bag of gunpowder to the canons
8) The French ships begin the barrage of canon balls as the English ships get closer.
9) Shot from left side of French ship. View of British ship getting closer.
10) View from French ship as British ship sails closer.
11) The British ships start firing back and French man is shot of some rigging.
12) View from British canon hole. Shows the side view of French ships and their canons firing past. The British canon is aimed and fires.
storyboard 1

hi guys iv finished the story boards i apologise in advance for the crude drawings but hopefully it will still make sense and give everyone a good understanding of the story plot. Also i have annotated every storyboard, describing whats happening in every scene.
1) Voice over as Horatio Nelson draws down the battle strategy.
2) Nelsons hand moves away from the paper and the camera zooms into the paper and fades out as the real battle alignment.
3) A shot from the HMS victory side camera right up against water with view of French ships in the distance.
4) French crewman spots the British fleet in the distance.
5) The crewman cry’s down to notify the rest of the crew.
6) The French ships canon shutters swings open and canons pop out. Camera sweeps past as shutters uniformly open and canons are prepared.
Wednesday, 31 October 2007
UV mapping


This is the proper method to create a UV map. First unwrap the map and then take in to Photoshop or something similar and create a map that is in accordance to the unwrapped map.
Add this to your model and this is what you get.
Unfortunately for me I had low resolution images of my face and also rushed the process of creating the map but if enough time and care is taken then it is more than possible to create photo realistic 3d models.
Add this to your model and this is what you get.
Unfortunately for me I had low resolution images of my face and also rushed the process of creating the map but if enough time and care is taken then it is more than possible to create photo realistic 3d models.
mapping to face


This is the stage where I noticed that a lot of people were cheating as instead of creating a proper UV map of their face what they did instead, was use the UV map gizmo to place the map over the correct part of the face.
Even though the front of the face looks fine, look at what happens to the side of the head and ears.
Also another negative in using this technique is that when animating the mouth for speech the map moves away from the model so making this technique pointless.
Even though the front of the face looks fine, look at what happens to the side of the head and ears.
Also another negative in using this technique is that when animating the mouth for speech the map moves away from the model so making this technique pointless.
defining face shape
creating the lips
shaping nose
Getting started

I think that I have put this off for long enough so here it goes. My next couple of blog entries will show the different stages that I went through to model my head. As you will probably notice the way that I created my head is a little different to the rest of you guys. Basically I spent my holiday learning a certain order and method of modelling a head from a book and so no video off YouTube was going to change my style. Plus that man had a very annoying voice and I couldn’t stand him.
Using the front and side photo of my face as a reference guide I first started to get the basic shape of a human head at this point it wasn’t particularly the shape of my head but will develop through the process.
Using the front and side photo of my face as a reference guide I first started to get the basic shape of a human head at this point it wasn’t particularly the shape of my head but will develop through the process.
Subscribe to:
Comments (Atom)


